
Mold growth in the shower and on bathroom walls is a common problem due to constant moisture, warm temperatures, and limited ventilation. If left untreated, mold can cause health issues and damage surfaces. Addressing it quickly and effectively is crucial for maintaining a safe and clean home environment.
Causes of Mold in Bathrooms
- Excess Humidity: Showers and baths produce steam that lingers in poorly ventilated spaces.
- Poor Ventilation: Insufficient airflow prevents humidity from dissipating effectively.
- Standing Water: Persistent water on bathroom surfaces creates an ideal environment for mold.
- Soap Residue: Soap film provides nutrients for mold spores to thrive.
Tools and Products You’ll Need
- Protective gloves
- Safety goggles or a face mask
- Scrub brushes (soft or medium bristle)
- Microfiber cloths or sponges
- White vinegar or hydrogen peroxide (natural cleaners)
- Baking soda (optional for scrubbing)
- Commercial mold remover (if necessary)
- Spray bottle
Step-by-Step Cleaning Process
- Ensure Proper Ventilation: Open windows, turn on fans, or use a dehumidifier before starting the cleaning process to minimize exposure to airborne spores.
- Wear Protective Gear: Mold spores can trigger allergies or respiratory issues, so wear gloves, goggles, and a face mask for protection while cleaning.
- Mix equal parts white vinegar and water in a spray bottle.
- Alternatively, use hydrogen peroxide undiluted as it’s highly effective against mold.
- For stubborn stains, combine 1 teaspoon of baking soda with water to create a paste.
- Spray affected areas generously with your chosen solution.
- Let it sit for 10–15 minutes to break down the mold.
- Use a scrub brush or sponge to clean away the loosened mold.
- For grout lines or tight corners, use an old toothbrush.
- Rinse thoroughly with warm water to remove any remaining solution.
- Wipe down surfaces with microfiber cloths to ensure they’re dry.
- Inspect Surfaces: Examine cleaned areas for any lingering signs of mold; repeat steps if necessary.
Preventing Mold Growth After Cleaning
- Install an exhaust fan or ensure existing fans are functional.
- Wipe down shower walls after each use with a squeegee or towel.
- Keep windows open during showers when possible.
- Use mildew-resistant paint on bathroom walls to deter future growth.
- Regularly check for plumbing leaks that may contribute to excess moisture.
| Problem | Solution |
| Excess Humidity | Install exhaust fans; use dehumidifiers |
| Poor Ventilation | Keep doors/windows open post-shower |
| Standing Water | Dry surfaces immediately after use |
Addressing bathroom mold requires both effective cleaning techniques and proactive prevention strategies tailored to your space’s needs. By staying consistent with maintenance practices, you can enjoy a cleaner and healthier living environment free from persistent moisture problems caused by regular bathroom use.
Effective Solutions for Tackling Black Mold Deltona FL Homes
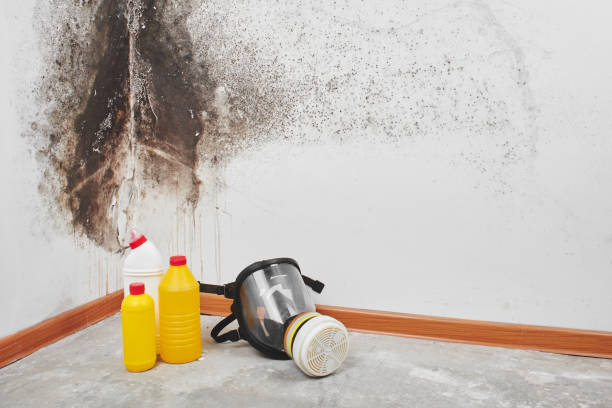
When dealing with mold in your home, it’s essential to choose the right products to effectively clean and prevent it from returning. Mold can pose serious health risks and damage your property if not addressed properly. Below is an overview of effective mold removal products, along with their uses and benefits.
1. Bleach for Hard Surfaces
Bleach is one of the most commonly used solutions for killing mold on non-porous surfaces like tiles, countertops, and glass.
Usage: – Mix one cup of bleach with a gallon of water. – Use a spray bottle or sponge to apply the solution. – Leave the solution on the surface for 10–15 minutes before scrubbing lightly and rinsing.
Pros: – Kills mold spores effectively. – Disinfects surfaces by killing bacteria along with mold.
Cons: – Not effective on porous materials like wood or drywall. – Releases strong fumes; ensure proper ventilation.
2. White Vinegar
White vinegar is a natural, non-toxic alternative for removing mild to moderate mold growth.
Usage: – Use undiluted white vinegar in a spray bottle. – Spray directly onto the affected area and let it sit for at least an hour before wiping it off.
Pros: – Eco-friendly and safe for use around children and pets. – Effective at killing most types of household molds.
Cons: – May leave a lingering vinegar odor that requires airing out the space.
3. Hydrogen Peroxide
Hydrogen peroxide is another non-toxic option that works well on various surfaces, including walls, ceilings, bathroom fixtures, and even fabrics.
Usage: – Mix hydrogen peroxide (3% solution) into a spray bottle. – Apply generously onto the affected area and let it bubble for about 10–15 minutes before scrubbing gently with a brush or cloth.
Pros: – Kills both mold spores and bacteria without harmful fumes. – Safe on porous surfaces like wood when used properly.
Cons: – May cause discoloration on some fabrics or painted areas.
| Product | Best For | Key Advantages | Drawbacks |
| Bleach | Non-Porous Surfaces | Strong disinfectant | Harsh fumes; not for porous surfaces |
| White Vinegar | Porous & Non-Porous Surfaces | Natural & eco-friendly | Lingering odor |
| Hydrogen Peroxide | Multipurpose Surfaces | Safe & versatile | Possible discoloration |
4. Baking Soda
Baking soda is ideal for small-scale clean-ups or as an additional step following stronger chemical treatments to prevent regrowth.
Usage: 1. Combine one teaspoon of baking soda with two cups of water in a spray bottle. 2. Shake until dissolved, then spray over affected areas. 3. Scrub lightly after letting it sit briefly, then wipe away residue with water.
Pros: – Safe around kids and pets. – Prevents future mold growth because of its mild alkaline pH level.
5. Commercial Mold Removal Products
Specially formulated commercial cleaners are available in hardware stores or online retailers that target stubborn molds more aggressively than household items like vinegar or baking soda.
Some popular brands include: 1. RMR Mold Remover – Pros: Works quickly to remove stains; no scrubbing needed. 2. Concrobium Mold Control – Pros: Preventative properties; safe on most surfaces without harmful chemicals. 3. Mold Armor Cleaner – Pros: Powerful cleaning abilities; easy-to-use spray format.
Always follow product instructions carefully when using commercial solutions to ensure proper results without damaging your surfaces or exposing yourself to toxic chemicals unnecessarily.
Essential Safety Tips for Mold Inspection Deltona FL and Using Removal Products
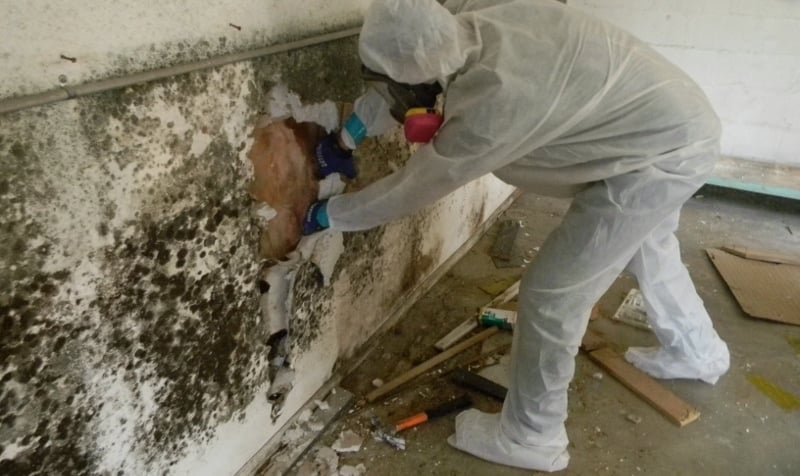
- Wear Protective Gear: Use gloves, goggles, and masks (preferably N95-rated) while cleaning areas affected by mold growth to avoid exposure to spores or fumes from cleaning agents.
- Ensure Proper Ventilation: Open windows and use fans when working indoors to minimize exposure to airborne particles or strong odors created by cleaners such as bleach.
- Test Before Full Application: For sensitive materials like fabric upholstery or painted walls prone-to-staining test any chemical cleaner first on inconspicuous spots check reactivity avoidance permanent damage risk etc
Comprehensive Guide to Mold Testing Deltona FL and Safe Removal Tips
Mold can present significant health risks and structural issues if not addressed promptly and appropriately. Safely removing mold from indoor surfaces involves understanding its causes, using proper techniques, and taking necessary precautions to protect yourself and your household. Read on for expert advice on effectively tackling mold while minimizing risks.
Precautions Before Starting Mold Removal
- N95 or higher-rated mask to prevent inhaling spores
- Safety goggles without ventilation holes
- Disposable gloves (nitrile or rubber)
- Long-sleeved clothing and pants that can be washed immediately after use
- Ensure Proper Ventilation:
Open windows and doors in the affected area to allow airflow, reducing the concentration of airborne mold particles. - Isolate the Area:
Use plastic sheeting or barriers to contain spores within the affected space and prevent them from spreading throughout your home.
Tools and Supplies You’ll Need
| Tools & Supplies | Purpose |
| Scrub brushes | To physically remove mold colonies |
| Microfiber cloths or sponges | For wiping smaller surfaces |
| Spray bottle | For applying cleaning solutions evenly |
| HEPA vacuum | To capture fine particles after cleaning |
| Mold removal solution | Specialized cleaners or DIY vinegar-based mixtures for killing mold |
Steps for Safe Mold Removal
- Assess the Damage:
Identify all affected areas, including hidden spots like behind furniture, under carpeting, or inside ventilation systems. - Test for Mold Type (Optional):
The type of mold (e.g., black mold) may influence how aggressively you need to respond. Testing kits are available online but may require professional analysis for accuracy. - A commercial mold remover is effective but ensure it is EPA-approved.
- Mix one part white vinegar with one part water.
- Alternatively, use a bleach solution (not recommended for porous surfaces): 1 cup bleach in 1 gallon of water.
- Remove Excess Moisture:
Use towels or a wet-dry vacuum to address dampness before beginning cleanup. - Scrub Non-Porous Surfaces:
Apply your chosen cleaning solution directly onto non-porous materials like tiles, glass, or metal. Let it sit for about 10 minutes before scrubbing with a stiff-bristled brush. - Dispose of Contaminated Materials Safely:
Any porous materials like drywall or carpeting that cannot be cleaned should be sealed in heavy-duty plastic bags before disposal. - Rinse & Dry Thoroughly:
Wipe down cleaned surfaces with water to remove residue and dry them completely using fans or dehumidifiers to prevent future growth.
Preventing Mold Regrowth Indoors
- Maintain indoor humidity levels below 50% using a dehumidifier.
- Fix leaks in plumbing promptly.
- Clean air ducts annually if prone to condensation buildup.
- Regularly inspect areas prone to moisture accumulation such as basements, bathrooms, and kitchens.
By following these steps carefully, you can safely remove mold while ensuring your home remains a healthy environment moving forward.
Step-by-Step Guide to Choosing the Best Mold Removal Company Deltona FL
Mold is a common problem in bathrooms due to the presence of moisture and humidity. Effectively removing mold requires the right approach, tools, and safety precautions. This guide provides a clear and practical step-by-step method to address mold in your bathroom.
Step 1: Gather the Necessary Tools and Safety Gear
Before starting, make sure you have everything you need for safe and efficient mold removal.
Tools You’ll Need:
– Gloves (rubber or nitrile)
– Safety goggles or glasses
– N95 respirator mask
– Scrub brush or sponge
– Microfiber cloths or disposable rags
– Spray bottle
Cleaning Solutions:
You can use one of the following solutions:
1. White Vinegar (undiluted) – Natural and effective for most types of mold.
2. Hydrogen Peroxide (3%) – Kills mold spores and disinfects surfaces without bleach.
3. Bleach Solution – Mix 1 part bleach with 10 parts water for tough stains (avoid mixing with other cleaners).
Step 2: Prepare the Bathroom Area
- Ventilate the room by opening windows or using an exhaust fan.
- Remove all items from affected surfaces, such as toiletries, shower curtains, or mats. Wash these items separately if they show signs of mold growth.
- Cover nearby areas with plastic sheeting to protect them from contamination during cleaning.
Step 3: Scrub Mold-Affected Areas
- Spray the chosen cleaning solution directly onto the affected areas (e.g., grout lines, tiles, caulking). Let it sit for at least 15–20 minutes to loosen mold spores.
- Use a scrub brush or sponge to scrub the area gently but thoroughly.
- Wipe down cleaned surfaces with a damp microfiber cloth or rag to remove any residue.
Tip: For hard-to-reach spots like corners or tight grout lines, use an old toothbrush for precision scrubbing.
Step 4: Rinse and Dry Surfaces Thoroughly
- Rinse the cleaned area with warm water using a clean cloth or sponge.
- Dry all surfaces completely using dry microfiber cloths or towels to prevent moisture from lingering—this is key to preventing regrowth.
Step 5: Address Stubborn Mold Growth (If Needed)
- Baking Soda Paste: Mix baking soda with water until it forms a thick paste; apply it directly on tough spots and scrub after letting it sit for 10–15 minutes.
- Mold-Specific Cleaners: Consider using commercial products designed specifically for stubborn bathroom mold.
Always follow manufacturer instructions when using chemical-based products.
Step 6: Prevent Future Mold Growth
- Use a squeegee after every shower to remove excess water from walls and glass doors.
- Improve ventilation by installing or regularly using an exhaust fan during showers/baths.
- Fix leaks promptly—whether it’s a dripping faucet, showerhead, or pipe under the sink.
- Keep humidity levels low (ideally below 50%) by using a dehumidifier if necessary.
| Prevention Task | Frequency | Benefit |
| Wiping down wet surfaces | After each shower | Minimizes lingering moisture |
| Cleaning grout/tiles | Weekly | Reduces potential buildup |
| Inspecting plumbing | Monthly | Addresses hidden leaks early |
By following this step-by-step guide and implementing preventative measures, you can maintain a cleaner, healthier bathroom environment free of harmful molds while extending its longevity over time.
The Best Cleaning Methods to Eliminate Mold and Prevent Its Return
Mold can become a persistent problem if not addressed properly. While cleaning mold is essential, preventing its return requires a methodical approach. Below are some of the best cleaning methods to eliminate mold effectively and ensure it does not make a comeback.
Assess the Severity of the Mold Problem
- Small patches: Can be cleaned using DIY methods with household products.
- Medium infestations: Require stronger chemicals and increased safety precautions.
- Large or recurring mold problems: May warrant professional intervention, especially for hidden mold growth behind walls or under floors.
Effective Cleaning Solutions for Mold Removal
- Vinegar has natural antifungal properties that can kill most types of molds.
- Apply undiluted white vinegar directly onto affected surfaces using a spray bottle. Let it sit for an hour before scrubbing with a brush and rinsing with water.
- This method works well on tiles, grout, sinks, and other non-porous surfaces.
- Baking soda is safe, non-toxic, and helps eliminate musty odors associated with mold.
- Mix 1 teaspoon of baking soda with 2 cups of water in a spray bottle, shake well, and apply to the area affected by mold. Scrub gently after letting it rest for 10 minutes.
- Use a 3% hydrogen peroxide solution as an alternative to bleach for killing surface-level molds without releasing toxic fumes.
- Spray it onto the surface and allow it to bubble for about 15 minutes before wiping clean with a damp cloth.
- Many specialized cleaning products target specific types of molds like black mold or mildew in bathrooms.
- Always follow manufacturer instructions when using these chemicals and use proper ventilation during application.
| Cleaning Method | Effectiveness | Surface Compatibility |
| White Vinegar | High | Non-porous (tiles, glass) |
| Baking Soda Solution | Moderate | Most non-porous/porous surfaces |
| Hydrogen Peroxide | High | Non-porous (walls, countertops) |
| Commercial Cleaners | Very High | Varies—check product guidelines |
Steps to Prevent Mold from Returning
- Control Humidity Levels: Maintain indoor humidity below 50%. Use dehumidifiers in problem areas like basements or bathrooms.
- Improve Ventilation: Ensure proper airflow by opening windows or installing exhaust fans in high-moisture areas such as kitchens and bathrooms.
- Fix Leaks Immediately: Address any plumbing leaks or roof damage promptly to prevent moisture buildup.
- Use Mold-Resistant Products: Opt for paints or building materials designed specifically to resist mold growth.
- Regular Cleaning Routine: Periodically clean areas prone to moisture accumulation using mild antifungal solutions.
Safety Tips During Mold Removal
- Wear gloves, goggles, and an N95 mask while cleaning.
- Avoid mixing ammonia-based cleaners with bleach as this creates toxic fumes.
- Discard porous materials like carpets or drywall if they have extensive mold damage.
By combining effective cleaning methods with proactive prevention strategies, you can successfully eliminate existing mold while reducing the risk of future infestations in your home or workspace.
Effective Strategies for Mold Removal Deltona FL: Understanding the Risks and Solutions
Mold is a common household concern that can pose significant health risks and structural challenges. Understanding the dangers associated with mold and addressing them effectively is crucial for maintaining a safe and healthy environment in your home. This guide explains the potential risks of mold exposure, how to identify it, and the best practices for tackling the problem.
Potential Health Risks of Mold Exposure
Mold releases microscopic spores into the air, which can lead to various health issues if inhaled or contacted. The severity of these risks may depend on the individual’s sensitivity, existing health conditions, or prolonged exposure.
- Respiratory Problems: Individuals may experience coughing, wheezing, nasal congestion, or throat irritation.
- Allergic Reactions: Symptoms such as sneezing, skin rashes, itchy eyes, or a runny nose are common in those allergic to mold.
- Asthma Complications: People with asthma may suffer from aggravated symptoms or increased frequency of attacks.
- Chronic Conditions: In extreme cases or after long-term exposure, mold can lead to more serious respiratory infections or toxic reactions caused by certain strains like Stachybotrys chartarum (commonly known as black mold).
How Mold Affects Your Home
- Structural Decay: Prolonged moisture leads to wood rot and weakens drywall.
- Unpleasant Odors: A musty smell often accompanies mold growth.
- Visible Stains and Discoloration: Surfaces such as walls, ceilings, and tiles are prone to discoloration due to active mold colonies.
Key Steps to Address Mold Safely
1. Proper Identification
- Inspect damp areas like basements, bathrooms, kitchens, or spaces with plumbing leaks for visible signs of mold.
- Look for discoloration (black spots or green patches) on walls, ceilings, tiles, carpets, and furniture.
2. Control Moisture Levels
Managing moisture is vital since high humidity serves as a breeding ground for mold: – Keep indoor humidity levels below 50% using dehumidifiers. – Fix plumbing leaks immediately. – Use exhaust fans in bathrooms during showers.
3. Wear Protective Gear
When removing mold: – Use gloves made of rubber or neoprene to protect your hands. – Wear an N95 mask or respirator to prevent inhaling harmful spores. – Protect your eyes with safety goggles without ventilation holes.
4. Clean Effectively
Small areas affected by non-toxic molds (e.g., Aspergillus): – Create a solution using water and detergent (or vinegar). – Scrub hard surfaces thoroughly using a sponge or brush. For larger infestations exceeding 10 square feet: – Seek professional remediation services.
Table: Recommended Cleaning Agents for Small Mold Problems
| Product | Application Area | Effectiveness Level |
| White Vinegar | Nonporous surfaces (tiles/walls) | High |
| Baking Soda Solution | Walls; painted areas | Moderate |
| Commercial Mold Sprays | Bathrooms; kitchens | High |
Preventive Measures
By taking preventive actions early on: 1. Ensure proper ventilation in high-moisture areas like bathrooms and laundry rooms. 2. Regularly clean gutters and ensure water drains away from your home’s foundation. 3. Check windowsills for condensation buildup during colder months.
Understanding how dangerous molds spread allows you not only to protect your family but also minimize costs associated earlier remediation efforts require less labor-intensive repairs later occurring damage unchecked spread
How to Properly Handle and Dispose of Mold-Contaminated Materials
When dealing with mold-contaminated materials, it is essential to follow proper procedures to ensure the safety of yourself, others, and the environment. Mishandling such materials can spread mold spores further, exacerbate health risks, and lead to recurring contamination. Below is a comprehensive guide on how to properly handle and dispose of mold-contaminated materials.
Safety Precautions Before Handling Mold-Contaminated Materials
- N95 or better respirator mask
- Disposable gloves (preferably nitrile or rubber)
- Goggles without ventilation holes
- Coveralls or long-sleeved clothing that can be washed immediately after use
- Ventilate the area: Open windows or use exhaust fans to create airflow that directs contaminated air outward but avoid spreading spores into other parts of your home.
- Seal off the working area: Use plastic sheeting and tape to isolate the affected zone from the rest of the house. This prevents mold spores from traveling.
Identifying Mold-Contaminated Materials for Removal
- Porous materials (e.g., drywall, insulation, carpets): These are highly susceptible to absorbing moisture and often require removal if significantly damaged by mold.
- Non-porous materials (e.g., glass, metal, hard plastics): These surfaces can typically be cleaned thoroughly using appropriate cleaning agents without removal.
- Semi-porous materials (e.g., wood): Cleaning may be possible depending on the level of contamination; however, in extreme cases where damage is deep-set, removal may be necessary.
Steps for Handling Moldy Materials During Removal
- Dampen contaminated surfaces first: Lightly misting the area with water reduces airborne spores during removal. Avoid excessive wetting that could worsen contamination in surrounding areas.
- Remove smaller items safely: Place smaller items like clothing or soft furnishings directly into heavy-duty garbage bags while still in the contaminated zone.
- Cut out damaged building materials: Use tools like utility knives or saws for precise cuts when removing sections of drywall or flooring that are beyond repair.
- Double-bag all waste: Seal each bag tightly before placing it into a second bag for added containment.
- Label bags appropriately: Mark all waste as “mold-contaminated” so it is handled correctly during disposal.
Proper Disposal Methods for Mold-Covered Waste
| Material Type | Disposal Method | Additional Notes |
| General household trash | Contact local waste management services regarding disposal policies | Not all areas accept moldy waste in landfills |
| Bulk construction debris | Arrange pickup with specialized environmental disposal companies | Check local regulations for hazardous material |
| Soft goods (e.g., textiles) | Launder immediately post-cleaning if salvageable; otherwise discard | Use hot water and detergent during laundering |
Post-Cleanup Procedures
After disposing of molded materials:
– Clean tools used during removal with a disinfectant solution containing bleach or another EPA-approved cleaner. – Vacuum surrounding areas using a HEPA-filter vacuum to capture remaining dust particles and loosened spores. – Wash protective clothing separately from regular laundry using hot water and detergent.
By adhering strictly to these guidelines for handling and disposing of mold-contaminated materials, you reduce health risks while ensuring that your space remains as free as possible from recurring mold issues.
- Step-by-Step Guide to Mold Removal Deltona FL
- Comprehensive Guide to Water Damage Restoration and Mold Removal Deltona FL
- Top 8 Reasons to Choose Professional Mold Removal Deltona FL Services
- Effective Mold Removal Deltona FL: Understanding Risks and Solutions
- Mold Removal Deltona FL: Understanding the Key Differences Between Mitigation and Remediation
- Effective Tips for Mold Remediation Deltona FL: Clean Your Shower and Bathroom Walls
- 6 Important Things to Know About Mold Removal Deltona FL Before Hiring a Professional
- How to Handle Black Mold Deltona FL and Its Impact on Your Health
- Mold Removal Deltona FL: Understanding the Key Differences Between Remediation and Removal